Contact support
Action Dashboard

The My actions tab in your Profile gives you a clear overview of all your pending tasks, helping you stay on top of your follow-ups and next steps.

  • Go to Profile in the left menu
  • Open the My actions tab

Action categories
Your actions are grouped into three categories:

  • Contracts to be signed: When an audience approves an offer via the Best Offer for You tool, a new action appears here. This means it’s time to send the contract and confirm the next steps.
  • Follow-up: Stay on top of engaged audiences. These actions are based on activity such as content views or interactions, helping you follow up at the right moment.
  • Reminders: Keep track of important actions, such as content that hasn’t been viewed yet or items that require your attention.

Managing your actions

  • Mark an action as complete by checking it off.
  • Remove an action if it’s no longer relevant.
  • Click Contact to quickly reach out using a suggested message.
View & Reactivate previous content versions

Need to review previous edits or go back to an earlier version of your content? With Version History, you can view who made updates, when changes were made, and easily reactivate any previous version when needed.

  • Go to your Content screen.
  • Click on a piece of content.
  • In the pop-up, click the INFO button.
  • A panel will open showing all the details of the content, including: folder location, creator and creation date, latest update, content ID, etc.
  • Scroll down to the version history to view:
    • A list of all versions
    • When each version was created
    • Who created them
    • The current status (Active or Previous)
    • The most recent, Active version is highlighted in green

Want to go roll back to a previous version?

  • First click on an older version. Then click SET ACTIVE  to make it the current live version.
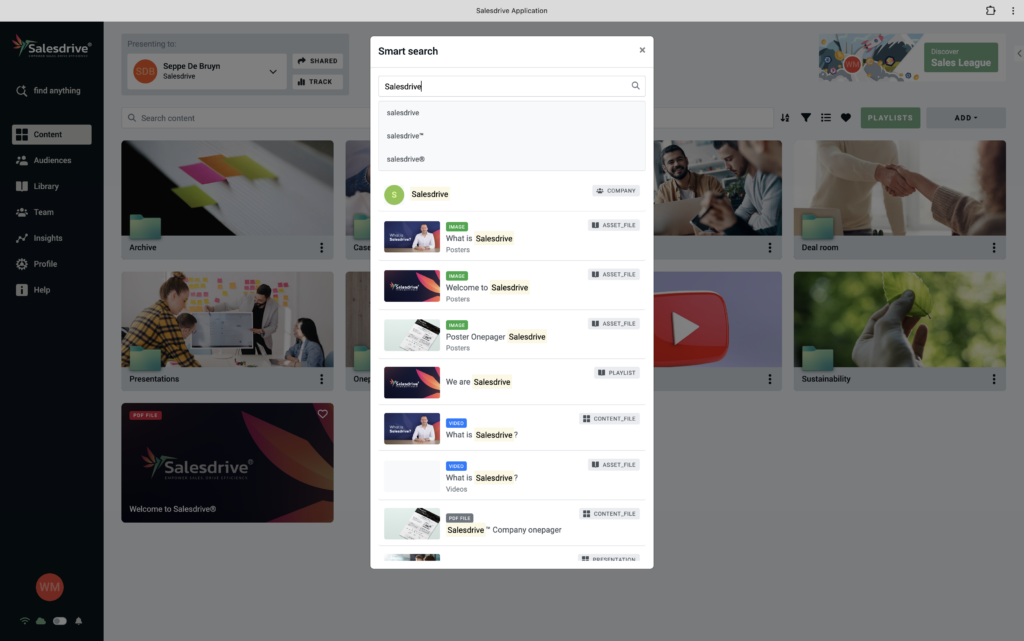
Search across the entire Platform

With Smart Search, you can instantly search across the entire Salesdrive platform, from content and files to users and audiences. It’s the fastest way to find what you need, no matter where it lives in the platform.

  • In the left-hand sidebar, click on Find anything button to open the Smart Search window.
  • You can search for content (presentations, apps, files), files stored in the library, app data, audiences & companies, users & teams, etc.
  • Clicking on any result will take you directly to that item, no extra steps needed.
How to loop a presentation

To loop a presentation and have it play automatically:

  • Go to the Content screen and click on the presentation you want to loop.
  • Click ‘Present’ to open the presentation.
  • Then, depending on your device:
    • On Mac: Press fn + F6
    • On Windows: Press F6

Your presentation will now auto-play, switching to the next slide every 8 seconds. Once it reaches the final slide, it will start again from the beginning.

Protect Buyer Portal Access

When sharing content with an audience, you can choose how secure their access should be.

  • Go to Audiences in the left-hand menu.
  • Select an audience.
  • Click on Portal Settings.
  • Click the dropdown menu under ‘Secure the portal’ to select one of the 3 available access types:
  1. Link only: The audience receives an email with a personal portal link. They can access the portal immediately by clicking Continue.
  2. PIN code: The audience must enter a 4-digit PIN code before accessing the portal. This code is shared manually by the Salesdrive user.
  3. Temporary access: The audience must request access by clicking the ‘Send email‘ button. The Salesdrive user receives this request and must approve access before the portal can be viewed.
Enable your audience to share feedback on your content and sales approach

Want to gather real feedback from your audiences? With Portal Rating, you can let prospects rate both the content they receive and the salesperson they interacted with.

  • Click Team in the menu on the left.
  • At the top, click Teams.
  • Select the team where you want to enable the Rating feature.
  • Scroll down to Extra Information and click Rating.
  • Toggle the Rating feature on and set how often you want audiences to be asked for feedback.
How to customize your audience’s Buyer Portal with a video
  • In the left menu, click Audiences and select the audience whose Buyer Portal you want to customize.
  • Once you’ve selected your audience, click on Portal Settings.
  • Under the Portal Background section, you’ll see the option to upload a background video.
    Click UPLOAD BACKGROUND VIDEO, then choose a video file from your computer.
  • We recommend uploading a short, silent looping video. Something that makes the Buyer Portal feel personal and on-brand.
  • And that’s it! Your audience will now see your custom background video when they open their Buyer Portal.
How to record a personal video message for your prospect
  • Click the RECORD A PERSONAL VIDEO MESSAGE button at the bottom of the screen.
  • A pop-up will appear asking for permission to access your camera and microphone — click Allow.
  • Click START RECORDING to begin your message.
  • You can stop the recording at any time (it will automatically stop after 1 minute).
  • Take a look at your video. Want a redo? Go ahead and record again.
  • Once you’re satisfied, click SAVE VIDEO to upload it to the Buyer Portal.
  • Want to see how it looks? Click PREVIEW PORTAL at the top to check your video in the portal.
  • That’s it — your video is now live and visible to your prospect!
View your content in a list

By default, Salesdrive shows your content in tile view, so you get a visual feel for your folder.

Prefer a simpler layout?

Click the list icon in the top right. Your content will switch to list view instantly.
To switch back to tiles, just click the icon again.

Choose the view that works best for how you like to browse.

Import files from another system (e.g. OneDrive)
  1. Click the ADD button on the top right side of your screen
  2. When you click this button, you can choose between Presentation, File, App and Folder.
  3. Click on FILE.
  4. In the pop-up window, click IMPORT FILES FROM ANOTHER SYSTEM.
  5. Select the system from which you want to import files.
  6. You have the option to choose from a list of recent files or you can search by name.
  7. Check the file(s) you want to import.
  8. When you’re done, click IMPORT SELECTED FILES.
  9. The file is now added to your Content screen and can be recognized by the logo of the system from which you imported the file.
How to import audiences from CRM
  1. Click IMPORT AUDIENCES at the top of the audience list to upload contacts from your CRM.
  2. Choose the CRM system you want to import from.
  3. You can then search for audiences by date or by name.
  4. Click SEARCH BY DATE or SEARCH BY NAME.
  5. A list of matching audiences will appear.
  6. Select the audiences you want to import from the list.
How to create and use a Playlist

Create a playlist

  • Click the green PLAYLISTS button.
  • Click CREATE PLAYLIST.
  • In the pop-up window, enter a name for your playlist and choose a poster image.
  • Click CREATE PLAYLIST.
  • Drag and drop content into your playlist.
  • To rearrange the order of the items, drag them up or down in the list.
  • Once you’re finished, you can either start presenting your playlist immediately or return to the playlists overview. Your new playlist will be automatically added there.

Present a playlist

  • To present a playlist, click the three dots next to the playlist.
  • In the pop-up menu, select PRESENT.

    Alternatively: click on the playlist to view its content, then click PRESENT at the bottom of the screen.
  • When presenting, you’ll see a playlist icon in the upper-right corner. Click it to see a vertical list of your playlist content.
  • Use the navigation buttons at the bottom or click on any item to navigate between content.
  • To stop presenting, click the arrow in the top left corner.
How to customize the Portal background for an audience
  • Click on Audiences in the menu on the left.
  • Select an audience.
  • Go to Portal Settings.
  • Under Customize Portal background, upload an image or a video to personalize the experience.
How to use the Outlook Salesdrive add-in

(Feature available on request)

  • Click on the three dots in your Outlook toolbar.
  • Click ‘Get Add-ins.’
  • Search for Salesdrive and add it to your toolbar.
  • Search for the content you want to share.
  • Click the green ‘SHARE‘ button.
  • A link will be automatically added to your email message.
  • Your email is now ready to send!
Filter audiences by custom properties

Create custom properties

  1. In the audience list, click the three dots next to the audience’s name.
  2. Select Edit in the pop-up menu to access their audience details.
    • Alternatively: when an audience is selected, you can also click the Audience tab at the top of the screen.
  3. In the Audience Details section, scroll down to fill in the audience properties setup specifically for your account.
  4. Do this for each audience.

Filter audiences by custom properties

  1. Click the filter icon (funnel icon) at the top of the audience list.
  2. In the pop-up window, make your filter selection.  
  3. Once you’ve chosen your filters, click APPLY FILTERS.
Like a presentation / content file
  1. In the “Content” screen, you are able to like your favorite content.
  2. On every content piece there is a selectable ‘heart’ icon.
  3. Once you click this, it turns white.
  4. When you click on the ‘Favorite’ filter, next to the search field, only the liked content will show up.
  5. Turning this filter off again, all content reappears.
Upload multiple files at once
Select multiple audiences at once
How to sort audiences per company?
How does Sales League work?

Sales League allows you to track and boost your activity based on “missions“. Every time you complete a mission, you earn coins. Some missions are worth more than others. The goal is to reach your monthly targets for each mission.  

The leaderboard displays the top performers in your sales team. You can filter this overview “per month” to see who did best in that specific month, or you can select “all time” to see who is leading the race since tracking has started. 

At the bottom of the screen, you see the journey you must undertake to obtain a new status or level. A new level always comes with a new status or “badge”. 

There are 2 simple rules you should know about: 

  • each mission has a maximum on coins you can earn per month. You know what the maximum is when no coins are added after completing a mission.  
  • if you present or share the same content to/with the same audience multiple times, you will only earn the related coins once. 

Are you ready to become the Demo God of Sales League? Go for it!

Share the Home screen folder with your Teams
  1. Go to “Home”
  2. Search for the Folder you want to share
  3. By clicking on the three dots in the bottom right corner of the folder icon, you go into the details of the folder
  4. Here you can make the folder visible to all teams you want to make it available to

A folder and its files can be shared with all available teams, but please note that all files need to be shared with the specific teams as well in order for the teams to see the files.

Example: if you create a folder with all price information for the accessories, make sure that these files are shared with the teams as well in order for the teams to see this information.

Add content files / presentations to the Home Screen folder
  1. Go to “Home”
  2. Search the file you want to add to the folder
  3. By dragging and dropping this specific content file to the folder, you add this file to the folder. It will become part of this new folder
  4. You can do this with all types of content files or presentations

Create a new folder in your Home / Show screen
  1. Go to “Home”
  2. Click on the button “NEW”, that you will see on the top right side of your page
  3. If you clicked on this button, you see that you can choose between Presentation, File, App and Folder. Click on Folder
  4. You can now give this folder a name and make is visible for specific teams
  5. Click on ‘Create Folder’ and the folder appears in your Home view and in the Home view of the teams you made it visible to
Delete files from the library

After you select a file in your folder, you will see multiple permisssion options when you scroll down

Click on the DELETE button to delete a particular file

Setting usability of files in the library

After you select a file in your folder, you will see multiple permisssion options on the right hand side

  • “Audience Personal File” – Enable this option if you want to tag a file as being personal only to your Audience
  • “Audience Picture“ – Enable this option if you want to use this picture as an Audience picture
  • “Desktop background“ – Enable this option if you want to use this picture as a Desktop background
  • “File icon“ – Enable this option if you want to use this picture as a file icon
  • “Folder icon“ – Enable this option if you want to use this picture as a folder icon
  • “General Document“ – Enable this option if you want to use this file as a general document
  • “Presentation Content“ – Enable this option if you want to use this file as a Presentation Content
  • “Presentation Poster“ – Enable this option if you want to use this picture as a Presentation Poster. A presentation poster is the image of the presentation that appears on the home-screen
  • “Slide Background“ – Enable this option if you want to use this picture as a slide background
  • “Team picture“ – Enable this option if you want to use this picture as a team picture
  • “User picture“ – – Enable this option if you want to use this picture as a user picture

The changes will be saved automatically. A pop up will appear in the top right corner to say that the changes are saved

Show files in the library
  1. Click on the file in the folder, on the right hand side you will see an option “Open”
  2. Click on Open
  3. The file will open in your device
Upload files in your folder in the library
  1. Click on any folder you have created
  2. You will see the option ‘+ add a file to this folder’
  3. Click on the button “+ Add a file to this folder” you will be redirected to your device folder structure to select a file
  4. Select any file of your choice. You can select up to 10 files with a file limit of 50MB each.
  5. The file(s) will be uploaded in the folder
  6. The types of files supported are: jpeg, png, pdf, doc, ppt, excel sheets etc
  7. The file you just uploaded will appear in your folder

Adding new folders in the library
  1. From the bottom menu in the home screen, click on the option “Browse Files”
  2. You will see all the folders listed on the left hand side
  3. On the top left you will find a button called “Create folder”
  4. Click on the “Create folder” button, a pop up appears
  5. Enter a name of your choice and click on the button “Create folder”
  6. A folder by the name you entered will be created and you can find it in the list of folders on the left

Add a company
  1. Click on ‘Companies’ in the top menu of the Account overview
  2. Click on ‘Add company’ to create a new company
  3. Fill in the necessary fields for a new company and click on ‘Add company’
  4. The new company is created and can be used for an audience
Delete a user
  1. Go to the user who you want to delete
  2. On the right side, scroll down to under “details”. There you will see the button “delete”
  3. Click on this button. A new pop-up screen will appear
  4. Click on “OK” and this user will be deleted

Please note that this can not be undone!

Add a new user
  1. On the left side of the page under the search field you will find the button with “Create user”
  2. Click on this button
  3. Add the name of the new user and his/her e-mail
  4. Choose a language
  5. Click on the button “Create user”, to officially add the new user
Find a specific user in a specific team
  1. Go to “Team” at the bottom of the page
  2. Now you can see everyone who has a user account
  3. You can use the ‘Team’ filter at the top on the left side of the page to select a specific team
  4. Search for the name of the user in the search bar on the left side of the page
  5. If you found the person you are looking for, click on him/her
  6. Now you can see all the information about the user
  7. If you look on the right side of the page, you can find details about this user. For example how many audience he/she has created, how many presentations he/she had created, …
Reading your Content insights
  1. Go to ‘Insights’ in the menu at the bottom of the home screen. You will see the insights for all available teams
  2. Click on the “CONTENT”-button on the top left corner to go to the content specific insights
  3. You can view the specific insights on different types of content for yourself as a user or for everyone in your team(s) within a specific duration of time. Both configurations can be set in the top right corner of your screen

Reading your users’ insights
  1. Go to ‘Insights’ in the menu at the bottom of the home screen. You will see the insights for all available teams
  2. Click on the “USER”-button on the top left corner to go to the user specific insights
  3. You can view the number of presentations they presented and shared and the number of times they logged in per user and in general in a specific duration of time which can be set in the top right corner of your screen.

Reading your Team’s insights
  1. Go to ‘Insights’ in the menu at the bottom of the home screen. You will see the insights for all available teams
  2. You can view the number of presentations they presented and shared and the number of times they logged in per team and in general in a specific duration of time which can be set in the top right corner of your screen
Reading your Audiences’ analytics
  1. Go to ‘Track’ in the menu on the top of the home screen. You will see the analytics from the selected audience.
  2. You can view the day and duration they have been looking at the presentations and files you have shared with them by clicking on the different items on the timeline.

Share a presentation with team(s)
  1. In the “Show” screen which is also your home screen, click on an existing presentation
  2. A pop up appears where you have to select the option “Share with team(s)”
  3. You will see a pop up screen which gives you the option to share with the specific teams of your choice
  4. Select the team you want to share the presentation with
  5. Give this team the access you want them to have to this specific presentation
  6. Your presentation will be shared with the team

Visitor Center / Portal

Details about the Visitor center / Portal

A Visitor center is an exclusive portal for every individual Audience. An Audience can view all the presentations shared by you in his Visitor Center.

When you as a Salesdrive user share the presentations with your Audience, the Audience gets a link to open his Visitor Center in the browser. When the Audience clicks on the link shared, he is asked to confirm his name and give consent to the usage of cookies, he can see the preview of all the presentations shared with him.

Once the Audience clicks any of the presentations shared with him, he can view them. All the Audience activities are tracked as analytics data which can be very useful for you as the Salesdrive user to understand your Audiences.

The audience can share a specific content file or the entire Visitor Center / Portal with a colleague or manager by clicking on the “Want to share this information with someone?” button. A pop up appears where you can add the name and email address of the person you want to share the content with. After clicking the “Send” button, the information is shared with this specific person.

The Portal also contains the option for the audience to remove him/her self out of the system. All data of this specific audience will be anonimised.

Stop sharing presentations with an audience
  1. From the list of shared presentations under the SHARED tab, click on any of the presentations
  2. On the right side of the screen you will see the option “STOP SHARING THIS ITEM”
  3. When you click on this button, the selected presentation will no longer be shared with the selected Audience
View shared presentations in Visitor Portal
  1. Go to ‘SHARED’ in the top menu
  2. On the left side of the screen you will see the option “PREVIEW (audience’s name) PORTAL”
  3. When you click on this button you will be redirected to the Visitor Center/ Portal
  4. In the Visitor Center you can see a preview of all the presentations shared with that particular Audience
Overview of all SHARED Presentations
  1. From the list of Audiences in your home screen select any specific audience you want to see an overview of the shared content of
  2. Click on the “SHARED” tab
  3. You will see the screen shown below. This basically shows an overview of all the presentations you have shared with the selected Audience

SHARE DETAILS

Access expires: Enable this to set an expiry date while sharing a presentaion. If this option is enabled you can enter a date – for example 06/12/2019 – only till this day the presentation will be avialable in the visitor center. If the “Access expires” button is not enabled, the presentation will be available to the Audience untill you stop sharing it with him.

Notify me when viewed: Enable this option if you want to receive notification via email when your Audience views the shared presentation

Share a presentation with an audience via link
  1. From the list of Audiences in your home screen select any specific audience you want to share a presentation with
  2. In the “Show” screen which is also your home screen, click on an existing presentation
  3. A pop up appears where you have to select the option “Share”
  4. You will see a pop up screen which gives you the option to share via email or via link
  5. If you want to share via link, click on “Via link”
  6. Access expires: Enable this to set an expiry date while sharing a presentation. If this option is enabled you can enter a date – for example 06/12/2019 – only till this day the presentation will be avialable in the visitor center. If the “Access expires” button is not enabled, the presentation will be available to the Audience untill you stop sharing it with him.
  7. Notify me when viewed: Enable this option when you as a user of Salesdrive, will get a message that the presentation is viewed
  8. After all the fields are filled, you can now click the “Share with audience” button
  9. You will see a link being displayed
  10. Click on the “Copy” button to copy the link

Share a presentation with a audience via email
  1. From the list of Audiences in your home screen select any specific audience you want to share a presentation with
  2. In the “Show” screen which is also your home screen, click on an existing presentation
  3. A pop up appears where you have to select the option “Share”
  4. You will see a pop up screen which gives you the option to share via email or via link
  5. If you want to share via email, click on “Via e-mail”
  6. Type the subject of the email in the “Subject” field
  7. Type the message of your email in the “Message” field
  8. Access expires: Enable this to set an expiry date while sharing a presentation. If this option is enabled you can enter a date – for example 06/12/2019 – only till this day the presentation will be available in the visitor center. If the “Access expires” button is not enabled, the presentation will be available to the Audience untill you stop sharing it with him
  9. Notify me when viewed: Enable this option when you as a user of Salesdrive, will get a message that the presentation is viewed
  10. Put myself in cc: check this box if you want to put yourself in cc while sharing the presentation with your Audience
  11. After all the fields are filled, you can now click the “Share with audience” button to send your email
  12. You can cancel sending via e-mail by clicking on the “Cancel” button

More about the visitor center is explained in the subsequent sections

Share a presentation with multiple audiences at once
  1. From the list of Audiences in your home screen select one or more audiences you want to share a presentation with
  2. In the “Show” screen which is also your home screen, click on an existing presentation
  3. A pop up appears where you have to select the option “Share with selected audiences”
  4. You will see a pop up screen which gives you the option to share via email or via link
Navigate through a presentation
  1. When presenting a presentation you can navigate across different slides and chapters
  2. Click on the ‘hamburger’ button positioned at the bottom of the slide in the centre
  3. You can see all the chapters of the presentation numbered 1, 2, 3 and so on
  4. Click on any chapter, you will see the list of slides in that chapter
  5. Select any specific slide if you want to present it

You can also navigate through a presentation by using the arrows on your keyboard or by using the arrows on the bottom left and right of the slides inside the presentation.

Delete an existing presentation
  1. In the “Show” screen which is also your home screen, click on an existing presentation
  2. A pop up appears where you have to select the option “delete”
  3. Now your presentation will be deleted

Deleting a presentation has consequences for every user of this presentation. The presentation will be deleted for all of its users.

You can only delete a presentation when you are the owner of the presentation or when you have the rights to delete it.

Rename an existing presentation
  1. In the “Show” screen which is also your home screen, click on an existing presentation
  2. A pop up appears where you have to select the option “edit”. Your presentation will open in the editor mode.
  3. On the top of your screen you see “Edit story”. If you click on this button, the presentation editing options will open. Here you are able to rename your presentation in the “name” field

Please note that you don’t always have the right to edit a presentation.

Copy a presentation
  1. In the “Show” screen which is also your home screen, click on an existing presentation
  2. A pop up appears where you have to select the option “copy”
  3. A copy of the existing presentation will be created by the name “Your version of (name of the presentation you copied)”

If you didn’t have edit rights before, you will have them now because you created a personal version of an existing presentation. This presentation is only visible for yourself unless you share it with your team(s).

Sorting your presentations
  1. In the “Show” screen which is also your home screen, you can sort the presentations the way you want
  2. Click on the drop down menu next to the search field
  3. Select the way the presentations and content need to be sorted. You will see the order of the presentations and content switch
Save a presentation
  1. In the Editor, when you have made changes to a presentation you can save by clicking on the save-icon on the left side of your screen.
  2. When you close the editor and you saved all your changes, these changes will be pushed through and all users of this presentation will see the changes.

A presentation is always saved as a whole, you cannot save separate modifications to elements such as slides or containers. Therefore, we advise to save a presentation on a regular basis to prevent losing data, that could be caused by for example if you would suffer sudden loss of internet connection that would terminate or reset your working session.

The duration of the saving process depends strongly on a number of factors: your internet connection speed, the amount of slides, the amount of media assets, the number of concurrent users that are active on your company’s presenter as well as the resources your computer has available.

Edit a presentation
  1. In the “Show” screen which is also your home screen, click on an existing presentation
  2. A pop up appears where you have to select the option “edit”
  3. You will be redirected to the editor mode where you can start editing the slides in the presentation
  4. When clicking on “EDIT STORY” next to the presentation name at the top, a pop up screen appears
  5. presentation name: You can change the presentation name
  6. internal name: You can enter an internal presentation name which will only be visible to you
  7. presentation notes: You can create your own presentation notes, visible only to you
  8. available language: You can select the language of your choice
  9. visual theme: You can select a theme of your choice from the drop down
  10. poster image: A poster image is the image of the presentation as shown on the home screen. You can click on the button. A list of images will appear to you right. Select an image of your choice to set it as a poster image
  11. You can delete a poster image by clicking on the trash icon

For extra information on how to edit a presentation, please navigate to the video ‘How to edit a presentation’.

Create a new presentation
  1. In the “Show” screen which is also your home screen you will see a “NEW” button to your right, choose this to create a new presentation
  2. A pop up appears where you have to input the presentation name and select a language. The presentation template will always be set to default
  3. Once you have put in all of the above details, click on the “Add new presentation” button
  4. You will be redirected to the editor mode where you can start inserting slides to create your new presentation

TIP: you can only edit a presentation if it is your own presentation, linked to your personal account, or if you have the rights to edit the presentation.

Present a presentation / content item
  1. When you are facing your prospects, select the audience to whom you are going to present and enable the small arrow next to the audience lis to hide the list of audiences from your prospect
  2. In the “Show” screen which is also your home screen, click on an existing presentation
  3. A pop up appears where you have to select the option “Present”
  4. You will be redirected to the presentation view where you can start viewing the presentation
  5. To navigate you can use the ‘left’ and ‘right’ arrows on your keyboard, swipe left or right on your device, or click the built-in arrows/navigation texts which are located on the bottom right and left side of each slide, or if available you can use the mouse wheel as well.
  6. You can click on the back button on the top left corner of your screen when you want to exit a presentation

TIP: Always select an audience before showing a presentation to make sure the presentation will be measured and shown in the analytics

Search a presentation
  1. In the “Show” screen which is also your home screen you will see a search field in the middle. Click on the search field to search for a presentation
  2. Type in the name or a part of the name of the presentation you are looking for
  3. The presentation you are looking for will appear

All content files will appear in the middle. Also the files that were sorted inside folders will show up outside the folders.

Share your audience with your teammates
  1. Select the audience you want to share in the left-hand column
  2. Click on the 3 dots and press ‘Share with team(s)’ OR go to AUDIENCE in the top menu and click on the ‘Share with team(s)’ button
  3. Select the team you want to share your audience with
  4. Click on ‘Start sharing’
  5. Tick on what you want the selected team to be able to do with the shared audience
  6. The changes will be saved automatically

You can also stop sharing the audiences by following the same first steps as above and click on the ‘Stop sharing’ button.

Delete an audience
  1. Click on the specific audience you want to delete
  2. Go into the Audience information by clicking on “Audience” in the top menu
  3. Click on the “Delete” button to delete the audience
  4. There is also the option to click on the three dots next to the audience name on the home screen. Here you have the option to delete the audience as well

! Please note this can’t be undone.

Select multiple audiences & companies
  1. Click on the ‘People’ icon in the top left corner to be able to select multiple audiences at once
  2. Click on the ‘Company’ icon in the top left corner to be able to select all audiences in one company
  3. Selection buttons appear in front of the audience & company names to be able to select multiple audiences at once

Go to the ‘Video’ tab in the help function to find videos about this topic.

Search and sort in your audience

On the left-hand side of your screen, you have the option to search for a specific audience by typing the name (or parts of it) or by typing the company if this is filled out.

You can also sort the audience from A to Z in the overview.

Edit an audience
  1. Click on the specific Audience you want to edit
  2. The last tab on the home screen top menu directs you to the Audience information
  3. Edit any specific details you want about the Audience and automatically all your changes will be saved

Create a new audience
  1. On the left side of your screen you can see all your audiences and you can also see the option to create a “New Audience”
  2. Click on the “Create Audience” button to create a new Audience
  3. A pop up appears where you can create your audience
  4. The Audience display name, the email address, company name and the language are the four mandatory fields
  5. You can even add a new company if necessary by clicking the green + button
  6. Other details to enter are the first name, last name. This can be done after the audience is created
  7. All changes will be saved automatically

The display name is the name that shows on the left side in the app and the name you and your audience get to see in every communication. When you send an e-mail to this audience, the display name is the name that will be shown.